Transcription of the video above
Customizing Logic Pro: From Economy Car to Formula One
Out of the box, Logic is dumbed down to the lowest common denominator. This is every preference, project setting and template choice we set up in class — the whole thing, in order, with the reasoning.
First written in 2018, for Logic 10.2. It has been in use at Beat Kitchen ever since.
Before you start
These instructions were written for an older version of Logic, but most of them are still relevant. Where a setting has moved or been retired, there is a note next to it.
- Backs up first. It saves the preferences you have now as a named version before it changes anything.
- Installs this setup. Every setting described below, applied in one go.
- Puts yours back whenever you want. Switch between your saved versions and ours as often as you like.
- Your key commands stay yours. It does not touch them.
Free · 988 KB · macOS only. Signed and notarised, so it opens without a security warning. Quit Logic before you install or restore a version.
One of Logic’s greatest advantages lies in its ability to be customized; but, out of the box, Logic is “dumbed down” to the lowest common denominator. Not to worry. I’m going to pimp your Logic install. Follow the guidelines below and you’ll be off and running. You’ve been driving an automatic, economy car. It’s about to become a Formula-One monster. When we are done, all that will be left is for you to learn how to drive it.
If you just want to skip ahead, there is a way to do this all at once. See this section under “Preferences and File Management”.
If you do that, here are a couple things to understand about what we are changing.
Preferences
These settings are saved when exiting Logic and applied to all sessions (globally). Opening any one of them will bring up a tabbed window in which any/all of them can be changed. Settings that I recommend as important or differing from the default values are noted below.
On older versions of Logic: most of the settings below are hidden until you switch on Show Advanced Tools in the Advanced tab. Current Logic has no such switch — the advanced tools are simply always on, so there is nothing to enable and you can go straight to the settings.
General
Editing
- Right Mouse Button: assignable as TOOL
- this is possibly the single biggest time-saver ever.
- Select Regions on track selection: ON
- Select Tracks on region selection: OFF
- Fade Tool click zones: ON
- Limit Dragging to one direction: BOTH (piano roll/score, tracks)
Cycle
- Pre-process: 1/96
- Smooth Cycle: ON
Catch
- When starting: OFF
- By position if catch and link are enabled: ON
Audio
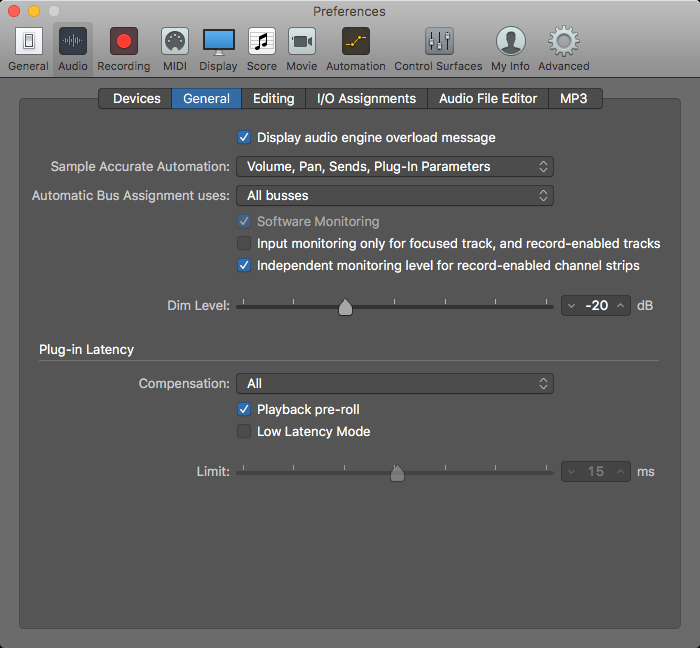
General
- Sample Accurate Automation: volume, pan, sends, plug-in parameters (i.e. ALL)
- Software Monitoring: ON
- Input monitoring only for focused track…: OFF !!!!!
- Independent monitoring level for record enabled channel strips: ON
Editing
- Scrubbing with audio: ON (normal speed for both)
I/O
- LRC-Lfe-Ls Rs
MP3
- Use VBR: ON
Recording
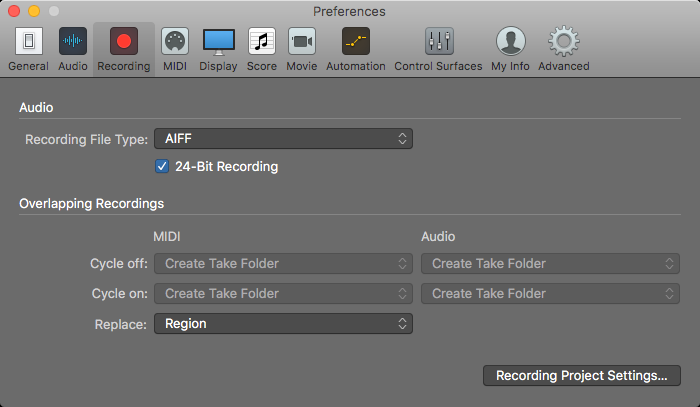
These are important settings! Note that in Logic 10.2 they were in the “Song Settings” folder.
Overlapping recordings
Cycle off
- MIDI: “Merge” — Audio: “Create Take Folder”
Cycle On
- MIDI: “Create take Folder” — Audio: “Create take Folder”
Replace: “Region”
Midi
Should be okay left at default values
Display
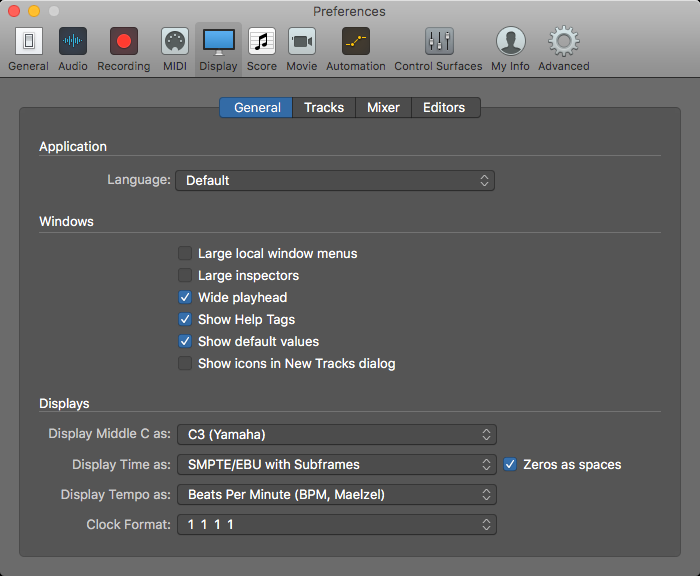
General
- Wide Playhead: ON
- Show Help Tags: ON
- Show Default Values: ON
- Show icons in New Tracks dialogue: OFF
Tracks
- Background: Custom
- Grid lines: Auto
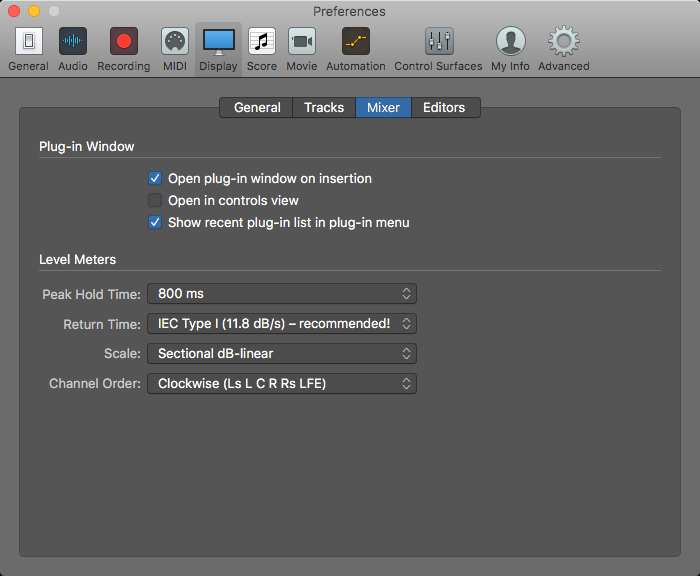
Mixer
- Show recent plug-in list: ON
- Scale: Sectional dB-linear
- Channel Order: SMPTE (L R C LFE Ls Rs)
Editors
- Bright BG
Score
Movie
Automation
Control Surfaces
My Info
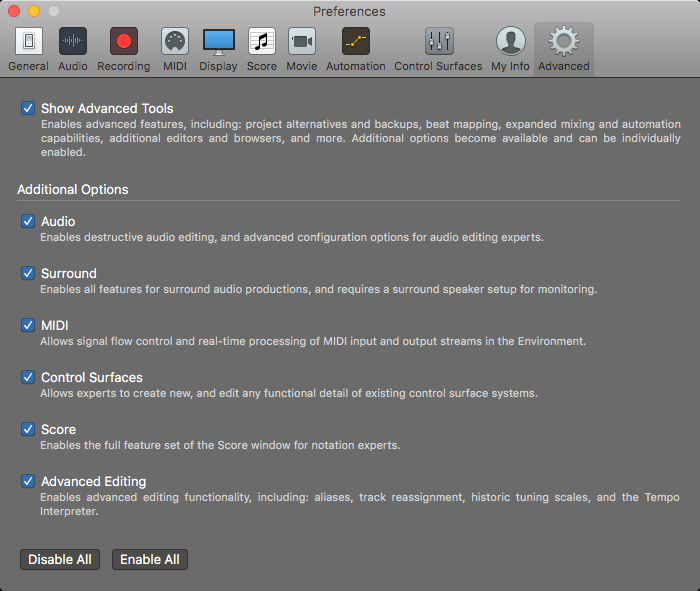
Advanced
Current Logic no longer has this pane — the advanced tools are always on and there is nothing to set. On older versions, Show Advanced Tools: ON, and enable every box.
Sound Library location
Logic’s sound library is large, and it will install to your system drive by default. You can move it to another drive, and there are two ways to do it. Only one of them is safe.
Move it with a symlink, not with Relocate
Logic offers a Relocate Sound Library command. Do not use it. It has disassociated the library here more than once, and Logic Pro Library.bundle has a habit of reappearing on the system drive afterwards.
Move the library folder to the drive you want by hand, then put a symbolic link where Logic expects to find it. Logic follows the link and never knows the difference — which is exactly how the GarageBand library link already works on a healthy install.
Project Settings
These settings are local to your current session/project file. But as it is very helpful to create a default starting template (see below), it is recommended to set these for the way you generally like to work.
General
- Use musical grid: ON
Synchronization
Metronome
Recording
- When Beginning: Count-in: 1 BAR
Overlapping
This setting was moved to Preferences: Recording: +Logic Pro-Setup: Recording
Tuning
Audio
General
- Pan Law: -3 dB compensated
- Apply Pan Law Compensation to Stereo Balancers: ON
Channel Strips
- Automatic management of channel strip objects: ON
- Automatic naming of channel strip objects: OFF
MIDI
Score
Movie
Assets
Template
The next thing you should do is set up your project/session the way you like to work. This is where the fun starts. When you are done, you will be saving it as a “template” (not a song) so that you can use these settings as a starting point in the future. But before you do…
Start with a “clean” song
No, not one with all the cursing beeped out — I mean lets make sure that we don’t have lots of tracks, effects, and unnecessary stuff in our project. Start a new song or remove, rename, colorize things to your liking. Think: “simple” for now.
Taming the library
Easily the most annoying thing to a seasoned Logic user, the Library is a quagmire of presets. We will be using it rarely. Logic, however, will be trying to open it every chance it gets. For example when creating a new track. Let’s take care of that first:
New Track > “Open Library” checkbox: OFF
Now it should remember that setting
Re-claim your screen-space
Logic for babies-time is over. Let’s make things look professional
Mixer
- View: HIDE LEGEND (this will give you easily another track of space)
- View: Configure Channel Strip Components
- Get rid of the icons
- show colors
- basically, check everything except ICONS and NOTES
- I like track name set to “one line”
Inspector
Now do all the same settings (or adjust to taste) in the channel strips of the “Inspector” (left side of the arrange window). These settings are separate from the ones you set for when you view the mixer.
Track Header
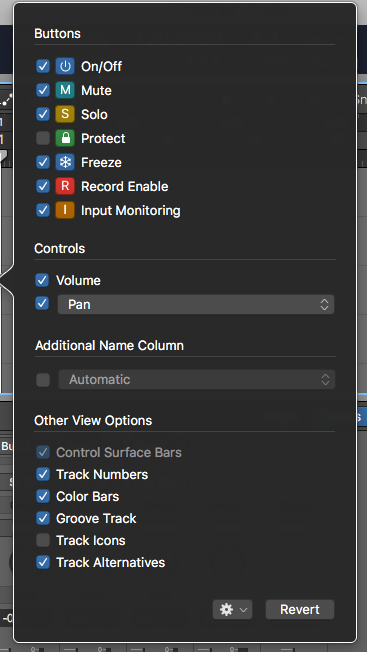
This too, is configurable. Lets make available some of the cooler, advanced features, at the same time, getting rid of the fluff. Right click on the track and choose customize track header.
- On/Off button: ON
- Mute: ON
- Solo: ON
- Protect: …maybe??
- Freeze: ON
- Record Enable: ON
- Input Monitoring: ON (but learn to use it)
- Volume: ON
- Pan: ON
- Additional Name Column: OFF
- Control Surface Bars: ON
- Track Numbers: ON
- Color Bars: ON
- Groove Track: ON
- Track Icons: OFF!!!!!!!!
- Track Alternatives: ON (but learn to use them)
Toolbar
Hide it! You’ll almost never need it once you learn some key commands
Control Bar
The control bar comes pre-configured for different types of projects. The problem is that none of them are probably yours. You can always go back to the old “Beats”, etc. settings, but we are going to create a custom control bar that will give us all the info we need at a glance and provide a bunch of cool buttons.
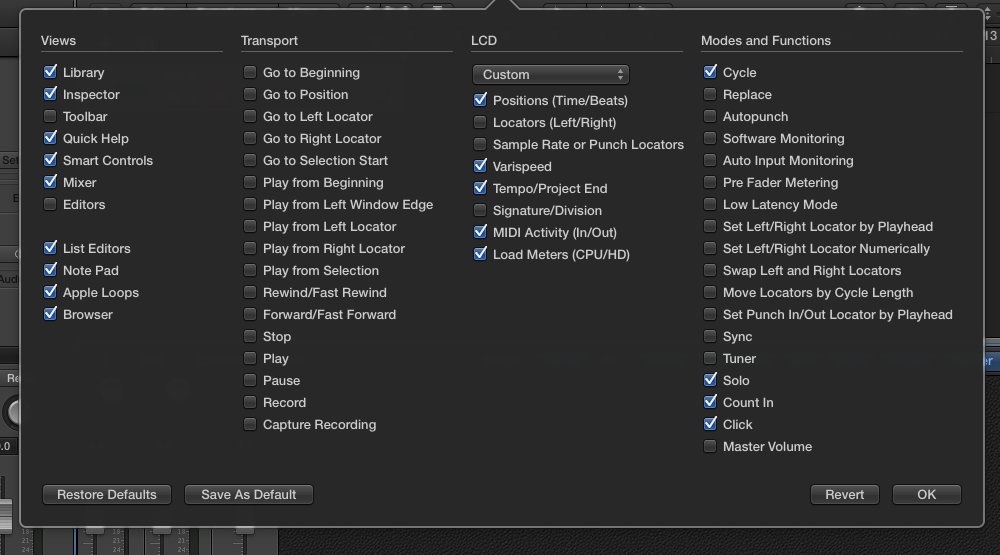
Customize Control Bar and Display
- right-click the control bar or choose this from the main view menu.
- Save it as the default when you are done.
Views
I turn off:
- Toolbar
- Editors
Transport
Get rid of all the transport elements
LCD
Here are what I think are some good settings for smaller screens:
Under the LCD section dropdown choose: CUSTOM!
- Positions: ON
- Locators: OFF
- Sample Rate/Punch: OFF
- Varispeed: ON
- Tempo/Project end: ON
- Signature/Division: OFF
- MIDI activity: ON (*screen-space permitting)
- Load Meters: ON (*screen-space permitting)
Modes and Functions
- Master Volume: OFF
- This is the most important. This is a disaster waiting to happen. TURN IT OFF!
- Tuner: OFF
- Auto Input Monitoring: OFF
- Pre-Fader Metering: OFF
The rest is up to you. My favorites:
- Cycle
- Solo
- Count-in
- click
REMEMBER TO SAVE THIS AS THE NEW DEFAULT!
Song (Changes to Default)
Tools
Super-important: Set up your new tool (the one we enabled in Preferences>General>Editing)
This will open up very fast navigation and editing combinations.
I suggest:
- Left-click: POINTER (arrow)
- ⌘-click: SCISSORS
- Right-click: ZOOM (magnifying glass)
Snap Settings
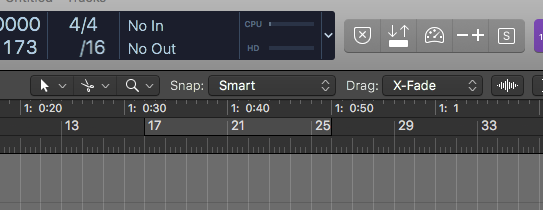
- Smart Snap
- Snap to Zero (from dropdown menu)
Drag Settings
- X-Fade
Global Tracks
Let’s turn them all off except for the “Marker” track. Track > Global Tracks…
Key Commands
I could write a book on this. The default is Option-K. Get to know this screen! Create your own set or pull from the preset list.
Preference and File Management
Okay, I get it. That’s a lot of stuff to do. So what if I just want it set like that without reading all of that? Well, yes, there is a way to do that. You need to understand a little about how Mac OS handles preference files, where it keeps them, and what changing them involves. Because I am hesitant to change your system preference for you or to do anything that is difficult to reverse, I have found a fairly simple way to take care of this.
Setup new Logic prefs… automagically!
-
Install the BKS Logic Preference Librarian — download it here. It backs up and restores Logic preferences for you.
-
Backup your existing preferences (just for Logic — although you can backup ‘all’ if you like)
-
Unpack this file to your desktop:
- The .plist file goes to:
~/Library/Preferences
- The .plist file goes to:
-
Open Logic (re-select your own key commands or choose the defaults, otherwise you will end up with my personal, crazy key commands).
- You will be greeted with a “Welcome to Logic” screen. This is normal.
-
Close Logic again. This will make sure they are saved.
-
Backup the preferences (with a new name) again using the Librarian.
Now you will have a way to undo all these changes. Next you will need to create a default template. I’ve already done that for you as well:
Open the other file
This is a Logic project. When it opens, save it as a template:
File > Save as Template…
Accept the default location. This template will now be available to you when you start a song. You can even set Logic to open a new project using this setting every time you launch the app. This setting is found in Preferences > General
The Beat Kitchen way
We built a small app that does this for you: it backs up whatever you have now, installs this set, and can put your old one back whenever you want.
Free · 988 KB · macOS, signed and notarised. If macOS ever does warn you about an app, right-click it and choose Open.
Screenshots
Every pane above, as it should look when you are done.
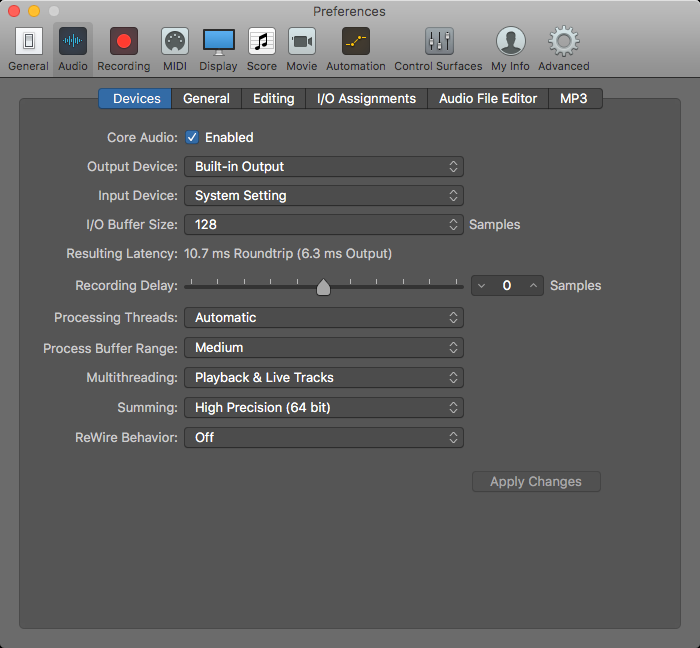
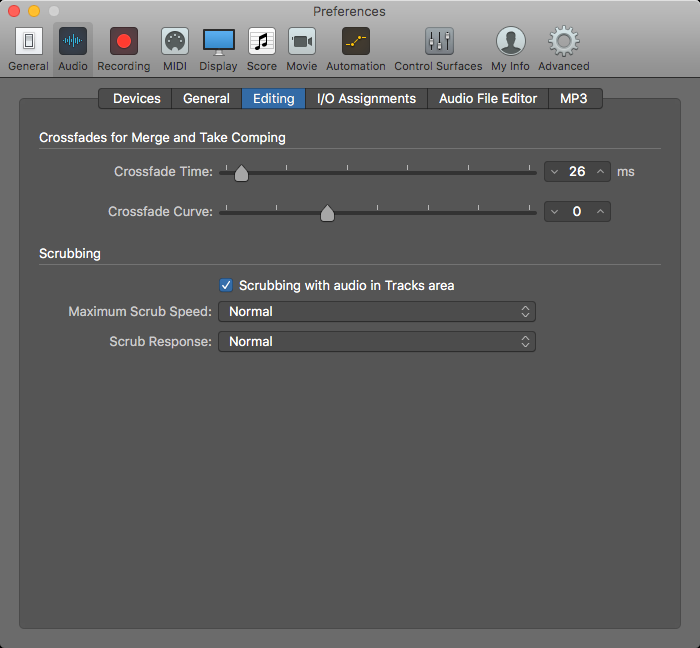
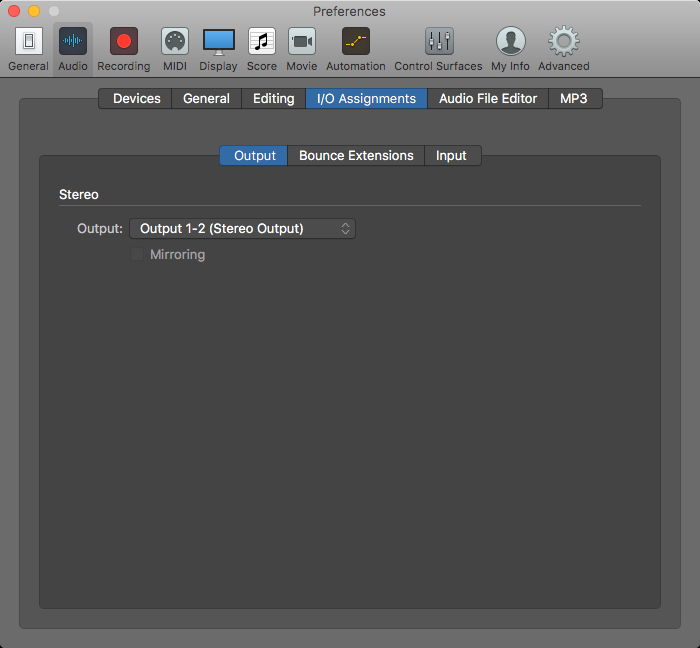
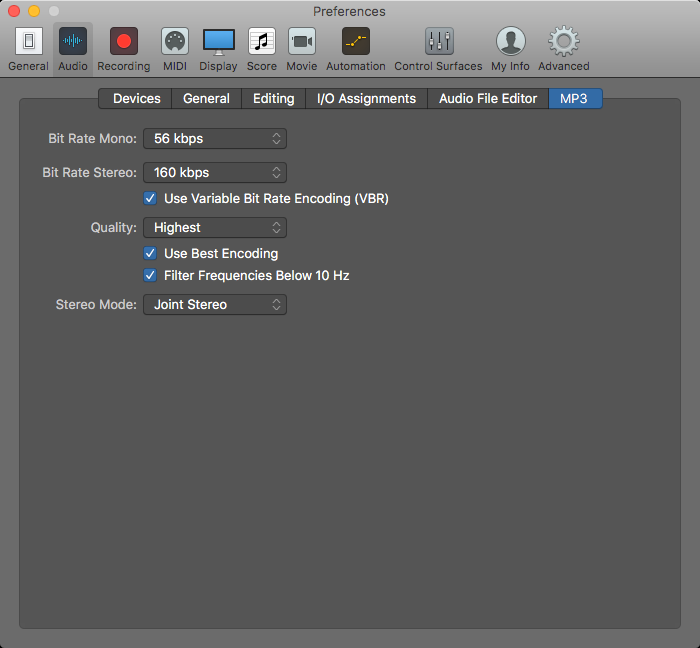
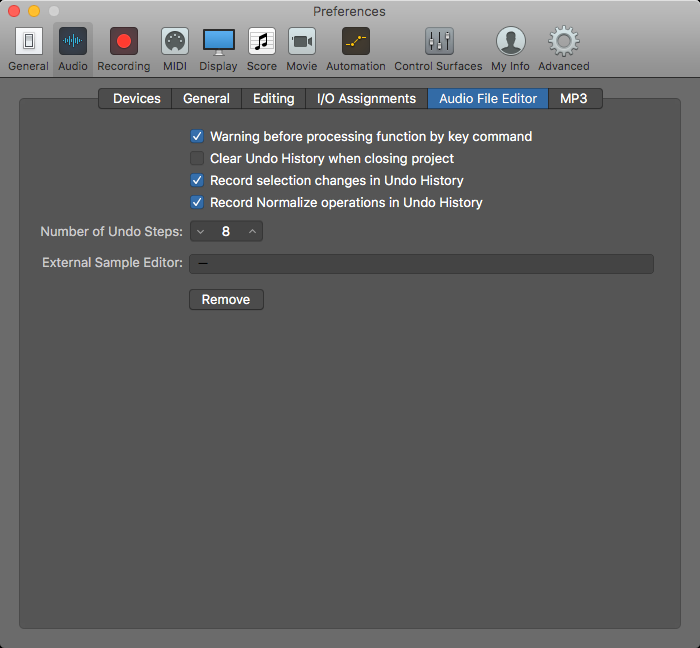
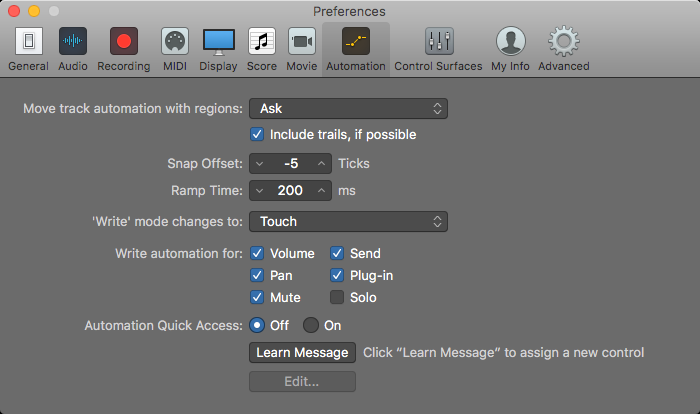
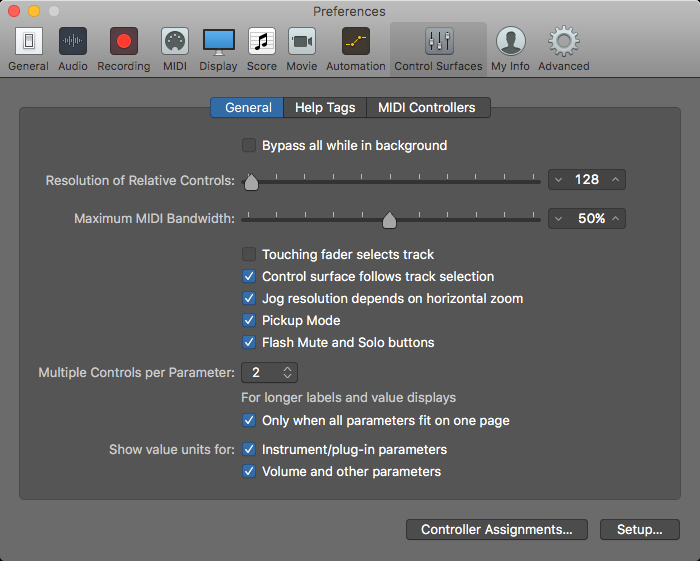
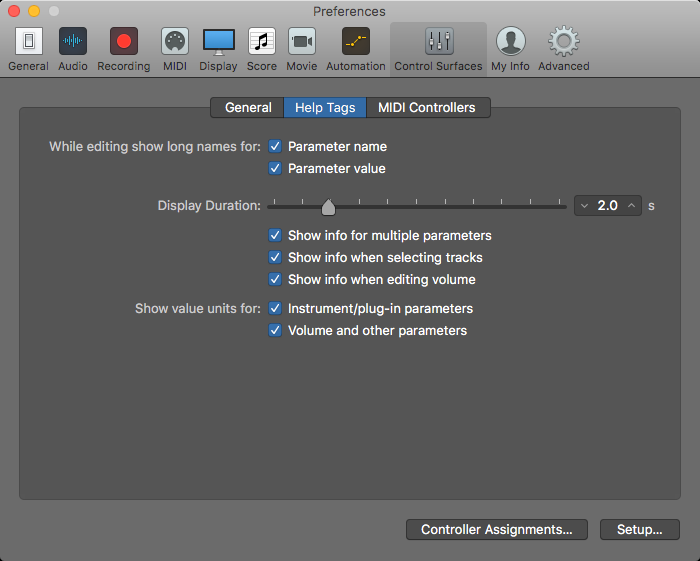
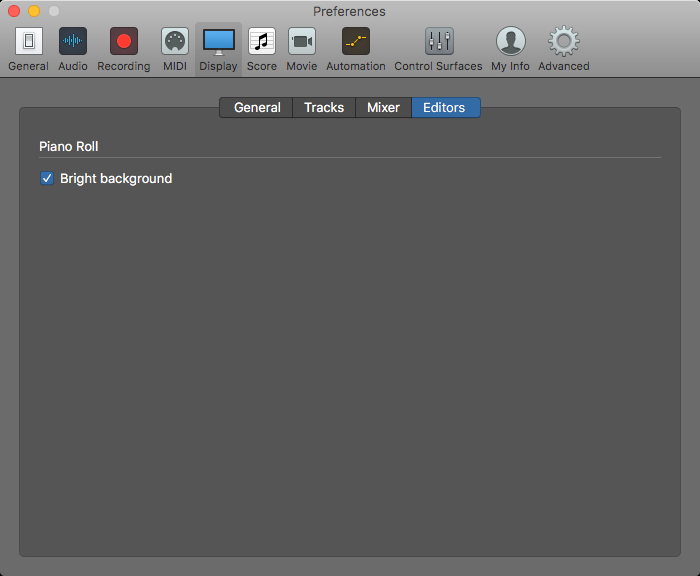
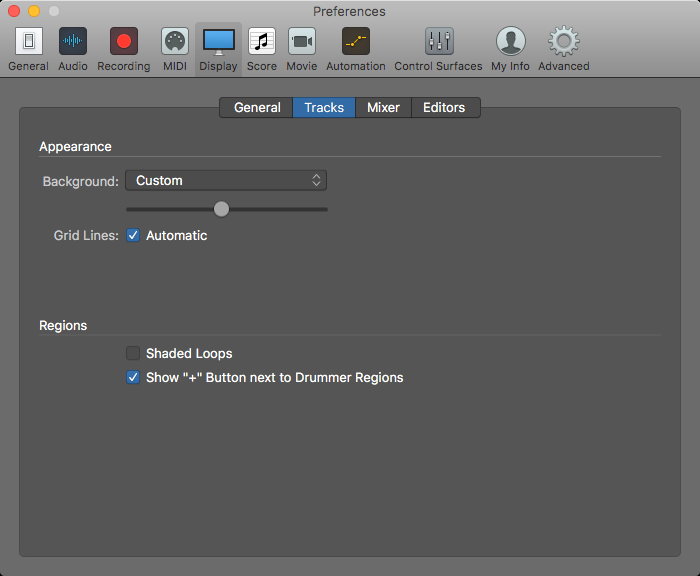
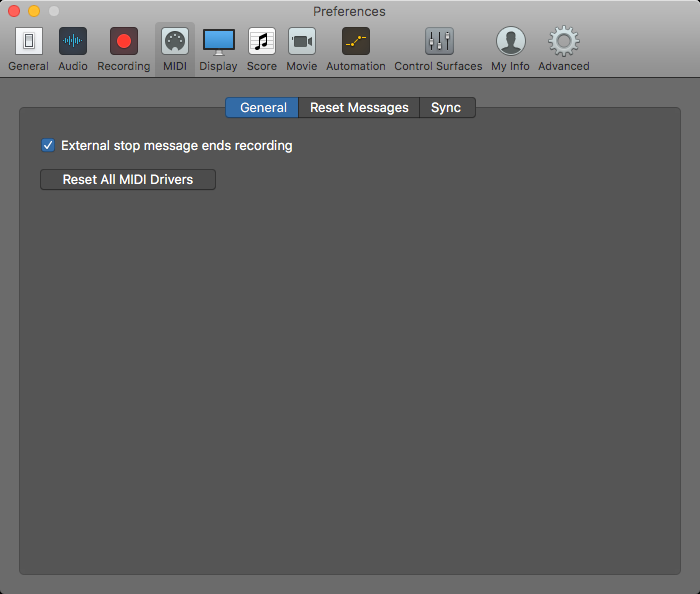
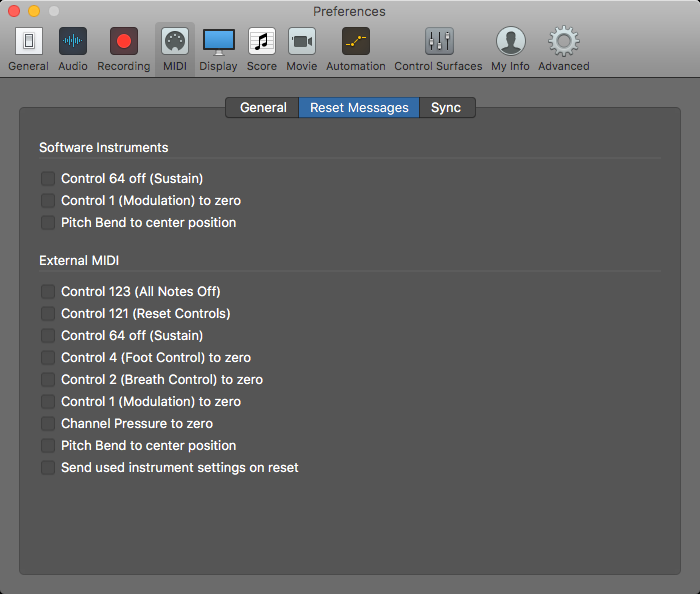
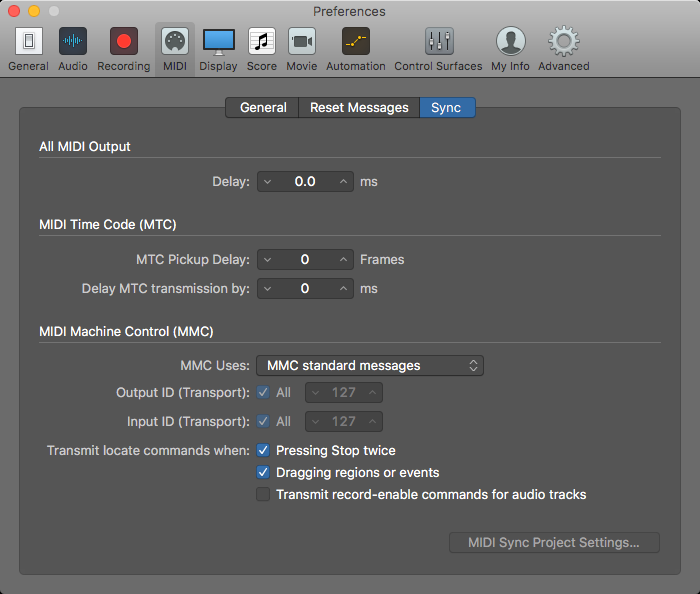
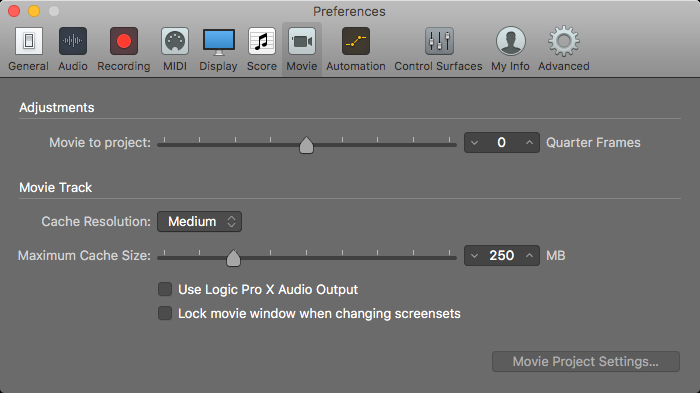
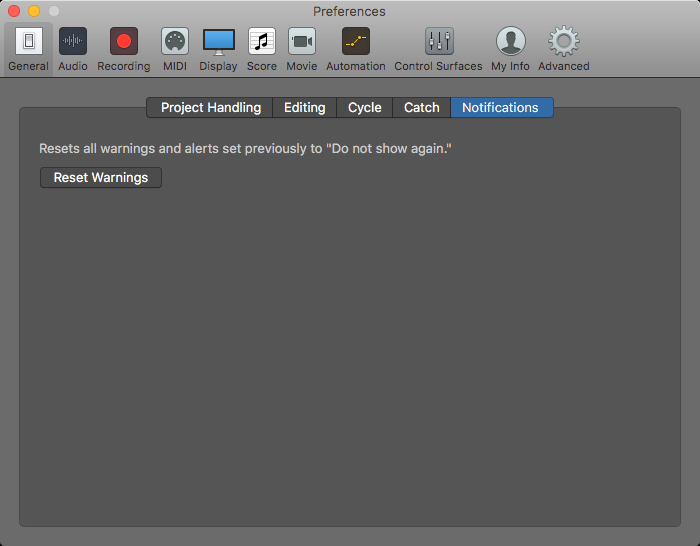
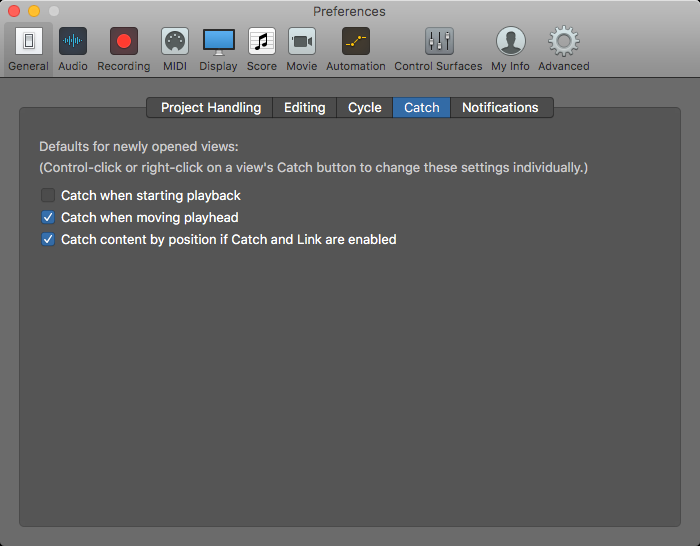
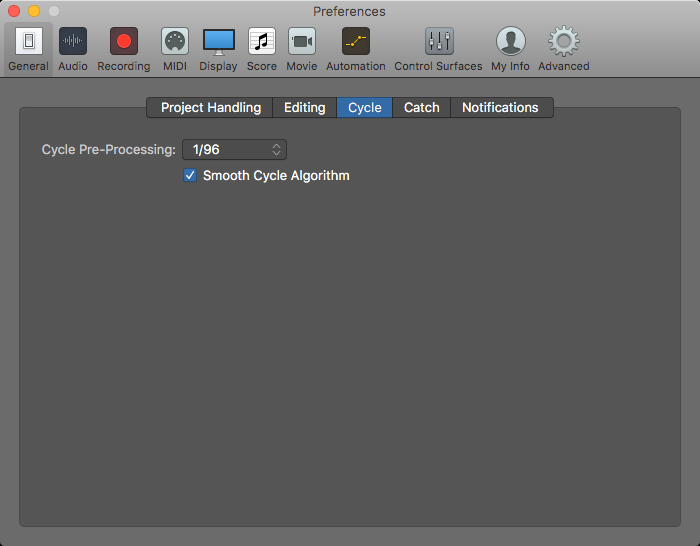
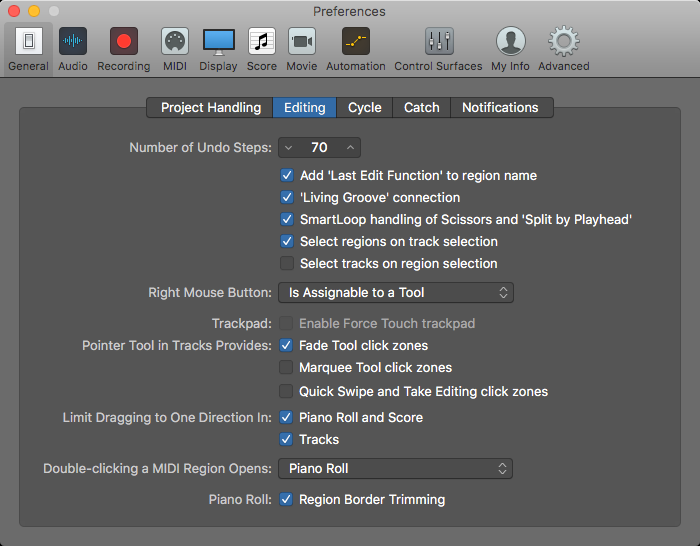
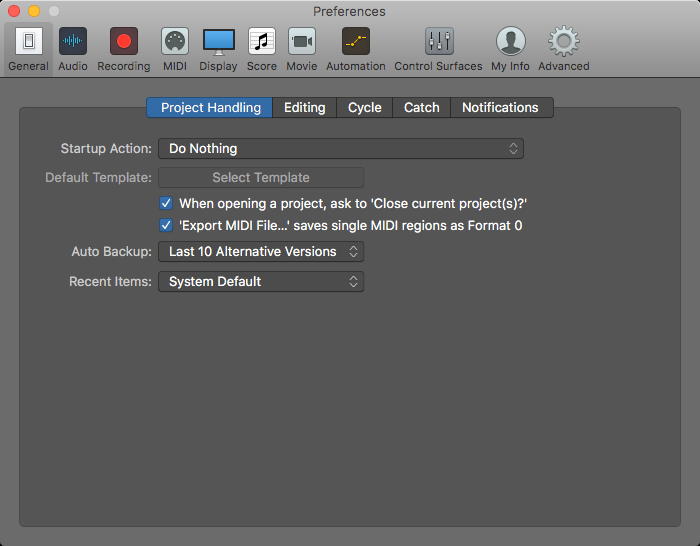
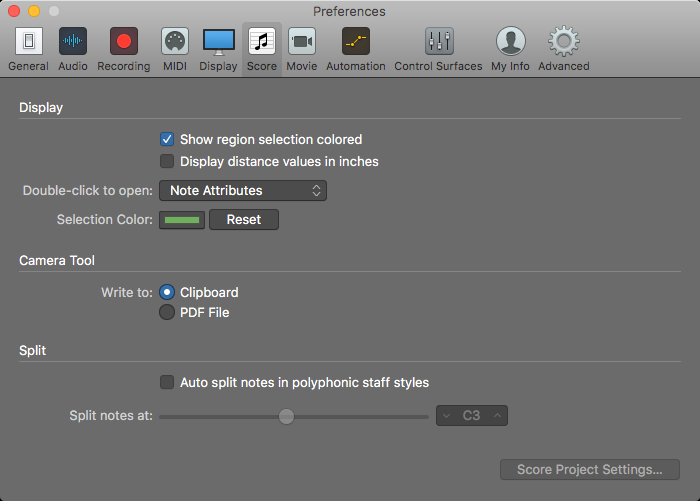
These are from the original 2017 write-up, so the window styling is older than your Logic. The settings are the same. Click any one to see it full size.
Learn more in the Logic Pro Core Skills guide.