
A cable is a conductor wrapped in an insulator. That’s all it is. But the connectors on each end, the number of conductors inside, and whether the signal is balanced or unbalanced determine whether your audio arrives clean or buried in noise. Cables are not glamorous, but a bad cable will ruin a session faster than a bad mic.
Connector Types
TS (Tip-Sleeve)
Two conductors: signal (tip) and ground (sleeve). This is your standard instrument cable — guitar, bass, keyboards. Also called a “mono quarter-inch.” Unbalanced only. Keep runs short — under 15-20 feet — or you’re inviting noise.
TRS (Tip-Ring-Sleeve)
Three conductors. Same physical size as TS, but with an extra ring contact between the tip and sleeve. A TRS cable can carry either a balanced mono signal (hot, cold, ground) or an unbalanced stereo signal (left, right, ground). Context determines which — if it’s going to a balanced input on your interface, it’s balanced mono. If it’s your headphones, it’s stereo. The cable doesn’t know or care. It just has three wires.
XLR
Three pins: hot (pin 2), cold (pin 3), ground (pin 1). The standard professional audio connection. Always balanced. Also carries phantom power — the 48V DC that condenser microphones need, sent from your preamp through the same cable that carries the audio. That 48 volts gets sent down both pin 2 and pin 3 equally. Because there’s no voltage difference across those two pins, your dynamic mic can safely ignore the current — it’s only visible when you measure against pin 1 (ground). That’s why we call it phantom power.
XLR connectors lock in with a latch. You’ll never accidentally pull one out during a take. They also have another advantage: on an XLR, pin 1 always connects to pin 1. On a TRS connector, the tip, ring, and sleeve make contact in the wrong order during insertion — the tip briefly touches the sleeve before landing on its proper contact. That’s why best practice says: plug in the microphones before you engage phantom power.
With phantom power comes great responsibility.
— Nathan Rosenberg, Beat Kitchen
RCA
Two conductors (center pin and shield). Unbalanced. Consumer gear — turntables, home stereo, some DJ equipment. They come in pairs (red and white) for stereo. You’ll encounter them, but they’re not what you’d choose to build a signal chain around.
MIDI (5-pin DIN)
Five pins, but only three are used. Carries control data, not audio. MIDI tells a device what to play — note on, note off, velocity, pitch bend — not how it sounds. Increasingly replaced by USB, but still common on hardware synths and drum machines. More on the MIDI protocol — including a useful adapter trick — in Chapter 16.
3.5mm (1/8-inch)
The headphone and aux cable. TRS (stereo) or TRRS (stereo plus mic, for phone headsets). Consumer format. Fine for listening, occasionally useful for connecting a phone or laptop to a mixer, but not a professional connection.
Balanced vs. Unbalanced
This is the concept that saves you from noise, and it’s worth understanding completely.
We live in electromagnetic soup, and an unbalanced cable carries the audio signal on one conductor, wrapped in a ground shield. Over short distances, that works fine. Over longer runs, the cable acts as an antenna — it picks up interference from power lines, dimmers, fluorescent lights, cell phones, anything nearby that generates a field. That interference shows up as hum, buzz, or radio bleed. It’s hard to keep that signal sterile.
A balanced cable sidesteps this in a clever way. It carries the signal on two conductors — one normal, one inverted (flipped 180° in polarity). Both conductors pick up the same noise along the way. At the receiving end, the device flips the inverted copy back and sums the two. The audio adds up and gets louder. The noise — identical on both conductors — cancels itself out. Anything that shows up equally on both wires is electrically flagged as contamination and eliminated.
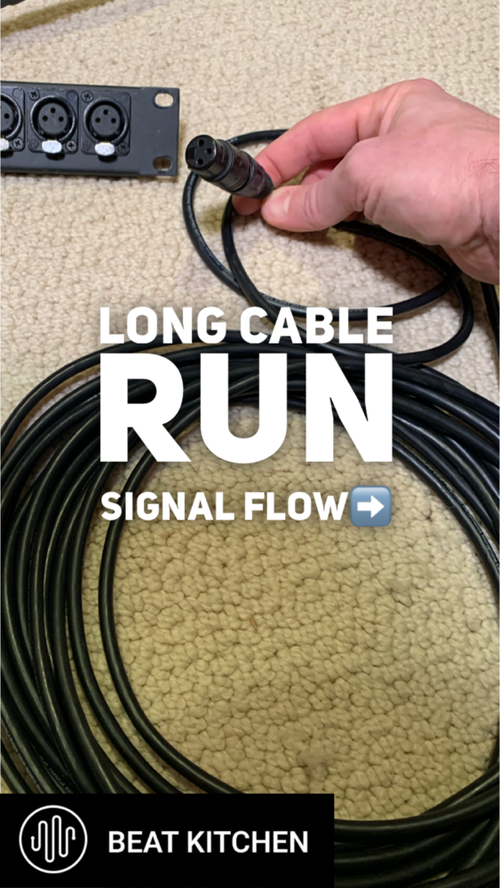
This is called common-mode rejection, and it’s the reason XLR and balanced TRS cables can run hundreds of feet with a clean signal. A balanced connection doesn’t make the output of your device quieter — it just protects the signal for a longer journey in silence. It’s simple, it’s elegant, and it’s the single biggest reason professional audio uses balanced connections for everything it can.
Signal Levels
Not all signals come out at the same volume. There are four standard levels in audio, and mixing them up is one of the most common beginner mistakes:
- Mic level — very quiet. This is what comes out of a microphone. It needs a preamp to bring it up to a usable level.
- Instrument level — slightly louder than mic level. Guitar pickups, bass pickups. Still needs amplification.
- Line level — the standard operating level for professional audio gear. Two sub-standards: +4 dBu (professional) and -10 dBV (consumer/semi-pro). That difference matters — plugging a -10 device into a +4 input gives you a thin, quiet signal. Going the other way can overdrive the input.
- Speaker level — amplified, powerful enough to physically move a speaker cone. Never plug a speaker-level output into a line-level input. You’ll damage the input and possibly your ears.
Getting levels wrong means either too much noise (signal too quiet, gain cranked to compensate) or distortion (signal too hot, clipping the input). Your interface has inputs designed for specific levels — mic/instrument inputs with preamps, and line inputs that expect a hotter signal. Use the right input for the right source. Chapter 4 covers this in detail.
Cable Care
A cable is only as good as its weakest solder joint. The way you wrap it determines whether those joints last ten years or ten months.
The over-under technique: alternate between an overhand loop and an underhand loop as you coil. This eliminates the internal twist that builds up when you wrap cables in one direction — the twist that eventually breaks the conductor at the solder point. The cable lies flat and tangle-free when you uncoil it, instead of springing into a kinked mess.
If someone on a session wraps your cables by twisting them around their elbow, you’re allowed to be upset about it. That’s not superstition — it’s physics. The twist stresses the same point at the connector every time, and eventually something breaks internally. The cable still looks fine. It just crackles, cuts out, or adds noise at random. Intermittent cable problems are the hardest thing to diagnose in a studio. The correct way to wrap a cable is kind of like the correct way to load the dishes in a dishwasher at somebody else’s house — just don’t wrap mine the wrong way.
What to Practice
- Identify every cable you own. Pick up each one. Is it TS, TRS, XLR, RCA? Balanced or unbalanced? Count the contact points on the connector if you’re not sure.
- Practice the over-under wrap. Take your longest cable and coil it with alternating overhand and underhand loops until the motion is automatic. It should lie perfectly flat when you set it down.
- Test for noise. Plug a guitar into your interface with a 20-foot unbalanced cable. Don’t play — just listen to the noise floor. Now try the same signal through a DI box into a balanced input. Hear the difference? That’s common-mode rejection.
- Check your input routing. Look at every input on your interface. Which ones are mic/instrument? Which are line? Make sure each source is plugged into the correct type.
Search This Guide
This Course
- 1. Sound, Electricity, and Transduction
- 2. Microphones: Types, Patterns, and Selection
- 3. Cables, Connectors, and Balanced Audio
- 4. The Audio Interface and Signal Levels
- 5. Digital Audio: Sampling, Bits, and Conversion
- 6. Recording in Mono
- 7. Working with Vocalists
- 8. Recording in Stereo
- 9. Mid/Side: Sum, Difference, and the Stereo Field
- 10. Recording Instruments
- 11. Speakers and Studio Monitors
- 12. Headphones and Monitoring
- 13. Studio Acoustics and Room Treatment
- 14. Metering, Levels, and Phase
- 15. Patchbays and Signal Routing
- 16. MIDI, Sync, and Networked Audio
- 17. Controllers and External Hardware
- 18. Cable Repair and Soldering
- 19. Session Planning and Workflow
- 20. Gear: What to Buy and When
- 21. Sources and Further Reading
Related Videos
Like what you're reading?
Everything in this guide is yours to keep. But reading about it isn't the same as hearing it, doing it, and having someone who's been at this for 30 years tell you why it matters in your music. This is one chapter of a live course — small group, cameras optional, taught by someone who gives a shit.
View the Hardware & Recording Primer Course →© 2026 Beat Kitchen School — beatkitchen.io. Licensed under CC BY-NC-SA 4.0. Free to share and adapt for non-commercial purposes with attribution.