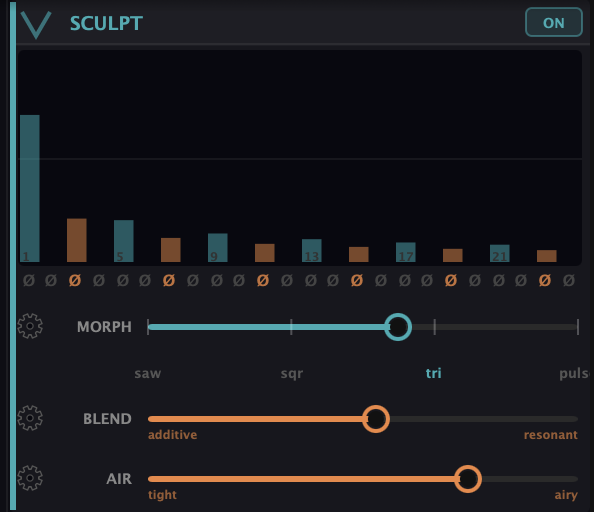
Where the partials matrix is a single dot doing a lot, Sculpt is hands-on. It’s a row of bars, one per partial, plus the controls that change what those bars are made of and where they sit in the stereo field. This is the section for drawing a spectrum by hand and for the synth’s most distinctive timbres.
The bars
The bars are multipliers on whatever the matrix is already producing. The midline is unity — leave a bar there and that partial is untouched. Drag a bar up to boost it (to twice its level) or down to cut it (all the way to silence). The bars use a square-root taper, so the quiet upper harmonics stay easy to grab instead of vanishing into the bottom pixel. Draw a comb — every other bar up — and you get a hollow, clarinet-like tone; carve a notch and you’ve removed a region by hand.
Level and Pan
The bars edit one of two things: partial levels or partial pan. The Show: Level / Show: Pan button switches which — the bars stay where they are, but your strokes write the axis named on the button (blue for level, violet for pan).
In Pan mode each bar becomes a signed bar rising from a centre line: up places that partial toward one side, down toward the other, centre is dead centre. The pan layer is translucent, so you can still read the levels underneath while you set the stereo image. Pan travels with the Formant shift, so a partial keeps its side as the spectrum moves. Double-tap a partial in Pan mode to return it to centre.
On touch you draw the bars directly: a sideways paint stroke sets values across the partials it crosses, while a single-partial up-or-down drag adjusts just that one, relative to where it already sat.
Morph
Morph is the fast way to a shape. It sweeps the bars between the four classic waveforms — saw, square (sqr), triangle (tri), and pulse (puls) — with a snap detent at each pure shape. The clever part: it accounts for the engine’s natural roll-off, so when you land on “square” it genuinely looks and sounds like a square wave, not an approximation. Morph is the quickest way to a familiar starting point you can then sculpt away from. Its two right-hand detents play back your own A and B shapes (see Reset and presets).
Formant
Formant slides the whole level curve up the harmonic series without moving any partial’s pitch. At the bottom it’s off. Raise it and partial 1’s level moves onto partial 2, partial 2’s onto partial 3, and so on — the old fundamental falls silent while the shape above it walks upward. Shift an odd-only spectrum up by one and it becomes even-only. It’s continuous, so between whole steps it crossfades rather than jumping, and partials pushed off the bottom are dropped, not wrapped. Overtone Scan and the other partial features follow the shifted material, treating the new lowest partial as the fundamental. The name is for what you hear — vowel-like motion as the spectrum moves — not a literal formant filter.
Blend — into resonant noise
This is the slider that takes BKS Harmonic somewhere other synths don’t go. Blend crossfades the whole Sculpt spectrum from additive (left — the pure summed partials we’ve been working with) to resonant (right). On the resonant side, the sound is no longer built from clean sine waves; it’s white noise run through sharp, high-Q peaks tuned to the same harmonics. You’re pulling pitched tones out of noise. The result is breathy and vocal — formant-like, alive in a way pure partials aren’t. Park it anywhere between for a sound that’s part tone, part air.
Air
Air only does anything once you’ve blended toward resonant. It sets how sharp those resonant peaks are — their Q. Push it toward airy and the peaks widen (breathier, noisier); pull it toward tight and they narrow (more pitched and focused). 50 is neutral. Think of it as how cleanly the noise resolves into pitch: tight for a clear note, airy for a breath of wind with a pitch hiding inside.
The phase row
Below the bars is a row of small Ø buttons — one per partial — that invert that partial’s phase. A specialist tool, but flipping a partial’s phase can hollow out or thicken a sound in ways a level cut can’t.
Reset and presets
Reset opens a short menu. Reset Level returns the level curve to a saw — the engine’s default shape, and a musical place to start over. Pan C centres every partial. Pan Saw and Pan Tri load the stereo panning built into those two waveshapes.
Copy to… writes the curve you’ve drawn into user slot A or B. Morph’s two right-hand detents then play those slots back, so you can morph between two shapes of your own: copy one curve to A, draw another and copy it to B, then sweep Morph between them.
What to Practice
- Set the bars flat, then use Morph to find a square wave. Now drag a few individual bars to sculpt away from it.
- Switch to Show: Pan, spread a few partials left and right, then raise Formant and hear the stereo image move with the spectrum.
- Sweep Blend slowly from additive to resonant on a held chord. Hear the tone turn breathy as the partials become noise-through-peaks.
- With Blend on the resonant side, move Air from tight to airy and back. That’s the dial between “pitched” and “windy.”
Search This Guide
This Course
- 1. What the Harmonic Synth Is
- 2. The Partials Matrix
- 3. Fold, Gin, and Tonic
- 4. Seeing Sound — the Scope
- 5. Partials Advanced
- 6. Sculpt — Shaping the Spectrum
- 7. The Overtone Scan
- 8. The Harmonic Envelope
- 9. The Harmonic Gate
- 10. Tuning — Stretch, Temperament, and Unison
- 11. Source 2 — the Second Layer
- 12. The Filter
- 13. The Envelope
- 14. Modulation — Making It Move
- 15. Output
- 16. Effects
- 17. Presets, Settings, and the Top Bar
- 18. Audio In and Resynthesis
When you're ready to take the next step, it starts with a place where you can ask questions. We teach live — small group, cameras optional, taught by someone who gives a shit.
Find Out How You Can Join Us →© 2026 Beat Kitchen School — beatkitchen.io. All rights reserved. Unauthorized reproduction or distribution of this material is prohibited.